
Fine Grained Classification
This post is about first lecture of fast.ai course and the lecture where Jeremy starts with explaining about the fastai library and then created a image classifier for mixed breeds of dogs and cats. So, lets jump in and start creating stuff.
Let’s first import the fastai library and fastai vision library which contains all pre-trained models and all the needed libraries for this project. You can read the documentation here. fastai has been built upon pytorch which is very widely used deep learning library.
from fastai import *
from fastai.vision import *
Now we’ll fetch the data from the link and untar it from the url ; define the path for images and annotations.
data_url = URLs.PETS

path = untar_data(data_url)
path_anno = path/'annotations'
path_img = path/'images'

fnames = get_image_files(path_img)
fnames[:1]
[PosixPath('/root/.fastai/data/oxford-iiit-pet/images/samoyed_189.jpg')]
fnames takes the images from the image path and it shows that the labels of the images are inside the picture names.
np.random.seed(2)
pat = r'/([^/]+)_\d+.jpg$'

data = ImageDataBunch.from_name_re(path_img, fnames, pat, ds_tfms = get_transforms(), size=224 )
data.normalize(imagenet_stats)
We fetch the labels from the picture names using the label expression in the above code which is a method of ImageDataBunch class.
The function from_name_re looks like this:
def from_name_re(cls, path:PathOrStr, fnames:FilePathList, pat:str, valid_pct:float=0.2, **kwargs):
        "Create from list of `fnames` in `path` with re expression `pat`."
        pat = re.compile(pat)
        def _get_label(fn):
            if isinstance(fn, Path): fn = fn.as_posix()
            res = pat.search(str(fn))
            assert res,f'Failed to find "{pat}" in "{fn}"'
            return res.group(1)
        return cls.from_name_func(path, fnames, _get_label, valid_pct=valid_pct, **kwargs)
Now we have stored our images and labels inside the data variables and when we execute the below code it’ll show us the pictures of animals.
data.show_batch(rows = 3, figsize = (12,7))
Training ResNet34
Transfer learning is a technique where you use a model trained on a very large dataset and then adapt it to your own dataset. The idea is that it has learned to recognize many features on all of this data, and that you will benefit from this knowledge, especially if your dataset is small, compared to starting from a randomly initialized model.
In practice, you need to change the last part of your model to be adapted to your own number of classes. Most convolutional models end with a few linear layers (a part will call head). The last convolutional layer will have analyzed features in the image that went through the model, and the job of the head is to convert those in predictions for each of our classes. In transfer learning we will keep all the convolutional layers (called the body or the backbone of the model) with their weights pretrained on ImageNet but will define a new head initialized randomly.
Then we will train the model we obtain in two phases: first we freeze the body weights and only train the head (to convert those analyzed features into predictions for our own data), then we unfreeze the layers of the backbone (gradually if necessary) and fine-tune the whole model (possibly using differential learning rates).
We’ll use cnn_learner to train our model with the pretrained ResNet34.
learn = create_cnn(data, models.resnet34, metrics = error_rate)
learn.fit_one_cycle(4)
learn.save('Stage-1')
This method creates Learner object from the data object. Then we run four epochs on this cnn model and check the result and then we save the model to go to fine-tuning; we save it so that if we don’t get better results from fine-tuning it then we can take our model back without training it again.
interp = ClassificationInterpretation.from_learner(learn)
interp.plot_top_losses(6, figsize = (15,12))
Interpretation methods for classification models provide a confusion matrix and visualization of the most incorrect images. Pass in your data, calculated preds, actual y, and your losses, and then use the methods below to view the model interpretation results. You can also see the most confused classes by using the most_confused() method of ClassificationInterpretaion class.
After checking all these details we can go on to fine-tuning the model and check if we can produce better results. We’ll do that with the learn.unfreeze() and will train some more to get better performance out of it. Now, if it doesn’t improve the accuracy we can always plot the learning rate and check out the regions where it’s giving us the least error.
learn.lr_find()
learn.recorder.plot()
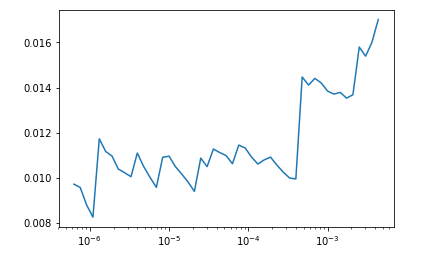
After looking at the areas where we see the least error rate we can fix our learning rate accordingly to optimize our model.
learn.unfreeze()
learn.fit_one_cycle(4, max_lr = slice(1e-6, 1e-3))
And now we have our model ready for deployment!!!
Source : fastai